Easily change the SIM card in your Canadian iPhone (7-16). Our step-by-step guide shows you where to find the tray, what tools you need, and how to fix common errors.
Change iPhone SIM Card: A Step-by-Step Guide for Canada
Change iPhone SIM Card: A Step-by-Step Guide for Canada
Tools Required to Change Your iPhone SIM Card
Changing the SIM card in your iPhone is a straightforward process, but you’ll need a couple of small items to get the job done correctly. Before you start, gather the following:
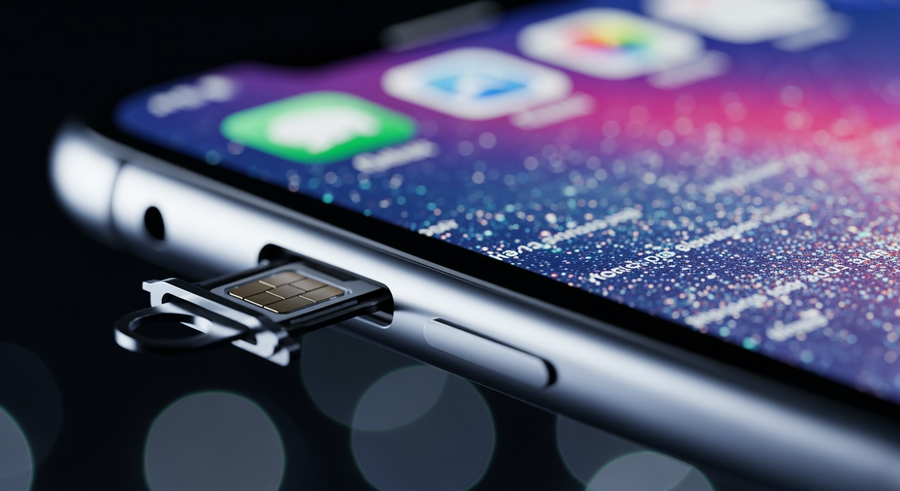
- SIM-Eject Tool: This is the small metal tool that comes included in the box with your iPhone.
- A Paperclip: If you’ve misplaced the official tool, a small, standard paperclip bent open will work just as well.
You should also confirm your new SIM card is the correct size. All iPhone models from the iPhone 7 through to the latest iPhone 16 use the Nano-SIM standard. To avoid losing the tiny SIM tray or card, we recommend working on a clean, flat, and well-lit surface.
This guide provides everything you need to know to change the physical SIM card on your Canadian iPhone, from model 7 up to the latest 16. You’ll learn what tools you need, where to find the SIM tray on your specific device, and follow a simple step-by-step process. We also cover common troubleshooting tips and answer frequently asked questions specific to Canadian iPhones.
TLDR
- You’ll need a SIM-eject tool or a paperclip.
- The SIM tray is on the left side for iPhone 12, 13, 14, 15, and 16.
- The SIM tray is on the right side for iPhone 7, 8, SE, and 11.
- Unlike US models, Canadian iPhone 14, 15, and 16 models do have a physical SIM tray.
- Push the tool into the pinhole, pop the tray out, swap the SIMs ensuring the notched corner aligns, and reinsert the tray gently.
📑 Table of Contents
Locating the SIM Tray on Your Specific Model
The first step is finding the SIM tray itself. Apple has changed its location over the years, so where you find it depends on the age of your iPhone. Hold your phone with the screen facing you to determine the left and right sides.
iPhone 12, 13, 14, 15, and 16 Series
If you need to replace the SIM card on an iPhone 16, replace the SIM card on an iPhone 15, replace the SIM card on an iPhone 14, replace the SIM card on an iPhone 13, or replace the SIM card on an iPhone 12, you’ll find the SIM tray on the left side of the device, located below the volume up and down buttons.
Crucial Canadian Note: While you may have heard that newer iPhones are eSIM-only, this is only true for models sold in the United States. In Canada, all iPhone 14, 15, and 16 models purchased directly from Apple Canada or from carriers like Rogers, Bell, and Telus still include a physical nano-SIM card tray.
iPhone 7, 8, SE, and 11 Series
For those looking to replace the SIM card on an iPhone 11, replace the SIM card on an iPhone 7, replace the SIM card on an iPhone 8, or replace the SIM card on an iPhone SE (2nd and 3rd generation), the SIM tray is located on the right side of the device, just below the side button (also known as the power button).
Step-by-Step Guide to Replacing the SIM Card
Once you’ve located the tray, it’s time to perform the swap. Follow these five simple steps to replace the SIM card on your iPhone.
- Power Down Your iPhone (Optional): While not strictly necessary, it’s good practice to turn your iPhone off completely before swapping the SIM card. Press and hold the side button and one of the volume buttons until the power-off slider appears, then slide to power off.
- Eject the Tray: Insert your SIM-eject tool or the end of a paperclip into the small pinhole on the SIM tray. Apply firm, gentle pressure straight in until the tray pops out slightly. Don’t force it or push at an angle.
- Remove the Old SIM: Pull the tray the rest of the way out with your fingers. Note the orientation of the old SIM card before lifting it out.
- Insert the New SIM: Take your new nano-SIM and place it into the tray. There is only one way it will fit correctly due to the small notched corner. Ensure the gold-coloured contacts on the SIM are facing down, away from you when you reinsert it.
- Reinsert the Tray: Carefully slide the tray back into the iPhone until it is flush with the side of the device. It should click into place smoothly. If you feel resistance, remove the tray and check that the SIM is seated correctly. Never force the tray back in.
After reinserting the tray, you can power your iPhone back on. It should automatically detect the new SIM and connect to your new carrier’s network within a minute. If you’re encountering power issues that aren’t related to your SIM, it might be worth considering an iPhone battery replacement to ensure your device runs smoothly.
Troubleshooting Common SIM Issues
Sometimes things don’t go as planned. If you’ve inserted your new SIM card and are running into errors, here are a few common problems and their solutions.
🚫 “SIM Not Supported” Error
This message typically means your iPhone is “locked” to a specific mobile carrier. If you bought your phone from Bell, for instance, it might not accept a SIM card from Rogers. Contact your original carrier to ask about unlocking your device. This is common when switching providers, especially if you’re moving from a contract plan to more flexible prepaid services.
❔ “No SIM Installed” Error
If your phone doesn’t recognize that a card is there at all, try ejecting the tray and reinserting it. Make sure the SIM card is seated correctly and that there is no dust or debris on the gold contacts. A gentle wipe with a microfibre cloth can help. In rare cases, this error can be one of the signs your phone has been hacked through a SIM swap attack, so be mindful of unexpected service interruptions.
🔩 Stuck Tray
If you cannot get the tray to eject no matter how much gentle pressure you apply, do not force it or use a sharp object. You risk damaging the internal mechanism. Your best bet is to visit an official Apple Store or an authorized service provider, where a technician can safely remove it for you.
Moving from Physical SIM to eSIM on Newer iPhones
While Canadian iPhones (14, 15, 16) retain the physical tray, they also strongly support eSIM technology. An eSIM is an embedded, digital SIM that allows you to activate a cellular plan without needing a physical card. Here’s what you should know:
- What is an eSIM?
- It’s a digital SIM that is built into your iPhone’s hardware. You activate it by scanning a QR code from your carrier or through your carrier’s app.
- The Advantage
- With an eSIM, you can have multiple lines on one phone (e.g., a personal and a work line) and switch between them easily. It also eliminates the need for physical swaps like the one described in this article.
- Converting in Canada
- On compatible iPhones (running recent versions of iOS), you can often convert your active physical SIM to an eSIM directly in your phone’s settings under `Settings > Cellular`. Check with your Canadian carrier (Rogers, Telus, Bell, etc.) to confirm they support this feature.
Frequently Asked Questions (FAQ)
Do I need to turn off my iPhone before replacing the SIM card?
It is considered best practice to power down your device to prevent any potential, though rare, data corruption. However, modern iPhones are “hot-swappable,” meaning they are designed to recognize a new SIM card even when powered on, usually without needing a restart.
Will replacing the SIM card delete my photos or contacts?
No. Replacing your SIM card will not affect any of your personal data. Your photos, apps, contacts, and messages are stored either on your phone’s internal storage or backed up to your iCloud account. The SIM card only stores information that identifies you to your cellular network.
Can I use a paperclip if I lost the SIM ejector tool?
Yes, absolutely. A standard-sized metal paperclip, bent so that one end is straight, is a perfect substitute for the official Apple tool. Just be sure to avoid using anything too sharp, like a needle or a pin, as it could damage the eject mechanism inside the pinhole.
Does the iPhone 14 or 16 in Canada have a SIM card slot?
Yes. This is a key difference between Canadian and US models. In Canada, the iPhone 14, iPhone 15, and the new iPhone 16 all retain the physical nano-SIM card tray, even though the equivalent models sold in the United States are eSIM-only.
What size SIM card does the iPhone 7, 11, and 13 use?
All iPhone models from the iPhone 5 onwards use the same standard: the Nano-SIM. This includes the iPhone 7, 8, SE, 11, 12, 13, 14, 15, and 16, so you won’t have to worry about getting the wrong size.
Written by
Conor Byrne
