Aprenda a trocar o cartão SIM do seu iPhone (7 a 16) com o nosso guia passo a passo. Encontre a gaveta, substitua o cartão em segurança e resolva erros comuns.
How to Change an iPhone SIM Card: An Easy Guide for Aussies
How to Change an iPhone SIM Card: An Easy Guide for Aussies
Changing the SIM (Subscriber Identity Module) card in your iPhone is a straightforward process, whether you’re switching carriers, travelling overseas, or upgrading your phone. This guide will walk you through everything you need to know, from finding the SIM tray on your specific model—from an iPhone 7 right up to the latest iPhone 16—to safely swapping the card and troubleshooting any common issues you might run into.
What You Need Before You Start
Before you get started, gather a few essential items to make the process smooth and hassle-free. You will need:
- Your iPhone.
- The new Nano-SIM card provided by your Aussie carrier (like Telstra, Optus, or Vodafone).
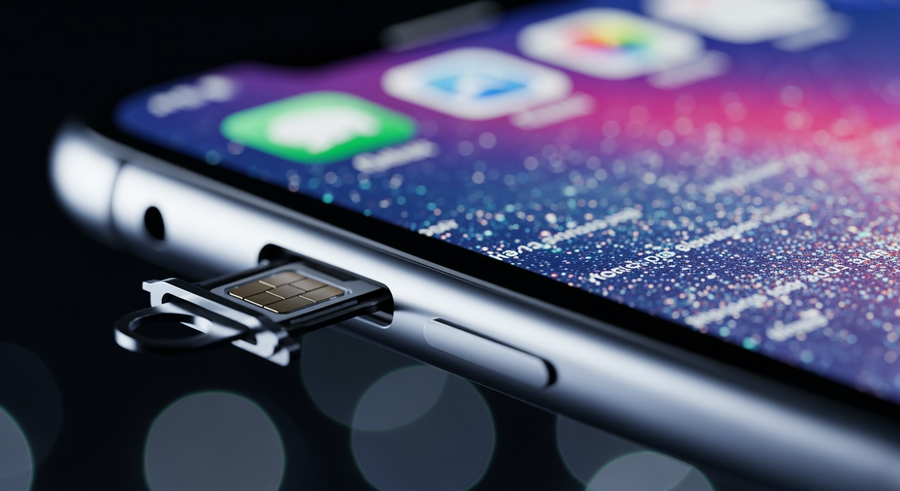
- A SIM-eject tool. This small metal tool is included in the box with your iPhone. If you’ve misplaced it, a small, straightened paperclip will work just as well.
It’s a good idea to quickly check that your new SIM card is the correct size. All iPhone models from the iPhone 5 onwards use the smallest size, known as a Nano-SIM. While it’s not strictly required, we also recommend turning your iPhone off before you begin. This prevents any accidental screen taps and ensures a clean reboot with the new SIM recognised properly.
Summary
This guide provides a complete walkthrough for replacing the physical SIM card in your Australian iPhone, covering models from the iPhone 7 to the iPhone 16. You’ll learn what tools you need, how to locate the SIM tray on different models, and follow a simple four-step process to swap the card. We also cover how to activate a digital eSIM, troubleshoot common problems like “No SIM” errors, and answer frequently asked questions about the process.
TLDR
- Get Ready: You’ll need your iPhone, a new Nano-SIM, and a SIM-eject tool (or a paperclip).
- Find Tray: On iPhone 12 to 16, the tray is on the left. On iPhone 11 and older, it’s on the right.
- How-To: Push the tool into the pinhole to pop the tray, align the new SIM using the notched corner, and slide it back in.
- Data Safe: Swapping a SIM won’t delete your contacts or photos; they’re stored on your phone or in iCloud.
- Aussie Models: Unlike US models, all iPhones sold in Australia (including the 14, 15, and 16) have a physical SIM tray.
📑 Table of Contents
Locating the SIM Tray on Your Model
Apple has kept the SIM removal process identical for years, but the location of the tray has shifted on different models. To save you from searching, here’s where to find it on your device.
iPhone 12, 13, 14, 15 and 16 Series
For these newer models, including the Standard, Pro, Pro Max, and Plus variants, the SIM tray is located on the left side of the phone, just below the volume up and down buttons.
🇦🇺 Important Aussie Note: While iPhone 14, 15, and 16 models sold in the USA are eSIM-only and have no physical SIM tray, this is not the case in Australia. All models purchased directly in Australia retain the physical Nano-SIM card tray, so you can follow this guide without any issues.
iPhone SE, 7, 8, and iPhone 11 Series
For a wide range of earlier models, stretching from the iPhone 4 all the way through to the iPhone 11 (and including all generations of the iPhone SE), the SIM tray is located on the right side of the device. You’ll typically find it underneath the side/power button.
Step-by-Step Guide to Replacing the SIM
Once you’ve located the tray, swapping the card is a quick, four-step process. Follow these instructions carefully to avoid damaging your phone or the new SIM.
Step 1: Ejecting the Tray
Insert your SIM-eject tool or a straightened paperclip into the small pinhole next to the SIM tray. Push firmly but gently, directing the pressure straight into the phone. You’ll feel a slight click, and the tray will pop out a little.
Step 2: Removing the Old Card
Pull the tray out of the slot completely. You can now lift the old SIM card out of the tray. It should come out easily without any force.
Step 3: Aligning the New Card
Take your new Nano-SIM and place it into the empty tray. To ensure the correct orientation, look for the notched corner on both the SIM card and the tray. It’s designed to fit in only one way, so match the angled corners up, and the card will sit flush inside the tray.
Step 4: Re-inserting the Tray
Carefully slide the tray back into its slot until it is fully flush with the side of the iPhone. It should slide in smoothly. If you feel any resistance, don’t force it. Pull the tray out and double-check that the SIM card is correctly seated before trying again.
Understanding eSIM on Newer iPhones (iPhone 13, 14, 15, 16)
If you’re using a newer iPhone, you might be looking to “replace” your SIM without physically touching a card. This is done using an eSIM (embedded SIM), which is a digital SIM that allows you to activate a mobile plan from your carrier without needing a physical Nano-SIM.
- What is an eSIM?
- An eSIM is a built-in, programmable SIM card. Instead of inserting a new card when you change carriers, you can download a new “SIM profile” directly to your phone. It’s more secure, as it can’t be physically removed if your phone is stolen, and it makes switching plans much faster.
Instead of swapping a card, you add an eSIM through your iPhone’s software:
- Navigate to Settings > Mobile (or Cellular on some models).
- Tap on Add eSIM.
- From here, you can either scan a QR code provided by your carrier or transfer a number from a nearby iPhone.
💡 Tip: Dual SIM Power
Modern iPhones support using one physical SIM and one eSIM at the same time. This gives you powerful Dual SIM capabilities, perfect for having separate work and personal numbers on one device, or for using a local data plan when travelling overseas.
Troubleshooting Common SIM Issues
Usually, the process is seamless, but occasionally you might run into a snag. Here’s how to handle the most common issues.
❌ “No SIM” or “Invalid SIM” Error
If your iPhone doesn’t recognise the new card, try these quick fixes:
- Toggle Airplane Mode on for 15 seconds, then turn it off.
- Restart your iPhone completely.
- Eject the SIM tray and ensure the card is seated correctly, then re-insert it.
⚠️ Tray Stuck
If the tray won’t eject or won’t slide back in easily, do not force it. You could damage the delicate internal pins. Check for any debris in the slot. If it still won’t budge, it’s best to visit an Apple Store or an authorised repairer for assistance.
💧 Water Resistance
Your iPhone’s water resistance rating (like IP68) depends on all seals being intact. After re-inserting the SIM tray, run your finger along the edge to ensure it is completely flush with the phone’s frame. A poorly seated tray can compromise its resistance to water and dust.
Frequently Asked Questions (FAQ)
Do I need to turn off my iPhone to change the SIM card?
No, you don’t have to. Apple devices support “hot swapping,” which means you can change the SIM while the phone is powered on. Your mobile signal will momentarily drop and then reconnect with the new SIM, usually within a few seconds.
Can I use a paperclip to open the iPhone SIM tray?
Yes, absolutely. A small, standard metal paperclip that has been bent straight works perfectly as a substitute for the official Apple SIM removal tool. Just ensure it’s thin enough to fit into the pinhole without force.
Will replacing my SIM card delete my photos or contacts?
No. On iPhones, all of your personal data like contacts, photos, apps, and messages are stored on the device’s internal memory or backed up to your iCloud account. The SIM card only holds information related to your mobile service. Replacing it simply changes your connection to the carrier network.
Why is there no SIM tray on my iPhone 14, 15 or 16?
This is a common point of confusion. If you purchased your iPhone in the United States, models from the iPhone 14 onwards are eSIM-only and do not have a physical tray. However, if you bought your device in Australia or most other countries, it will include a physical SIM tray alongside its eSIM capabilities.
Written by
Ruby Walker
